Sunday, November 4, 2012

Crocodile Clutch Pattern

Hi all! I am so excited to share with you the pattern / project that I was working on yesterday! I have gone through it a million times to make sure I wrote it correctly, but you know how it goes sometimes proof reading- you miss a bunch of stuff. So please tell me if there is anything that you need clarification on or is wrong :) Thanks and enjoy!

So my inspiration was this cute clutch on a blog that I follow. I love the colors she used and the stitch I learned a while ago but really haven't done much with it. It looked like an easy enough purse to make, so I went ahead and started it. But what I found was I really wanted the crocodile scales to go all the way around, so there was more of a finished look to me.. yes I'm nuts.  Soooo I had to adapt her pattern into my own and I just LOVE IT!


Notes:

-This pattern is worked using American crochet.
-The terms "crocodile stitch" and "scale(s)" are used interchangeably.
-With the crocodile stitch, it is worked from the front only, no "real" turning is involved. And you will always end on a "crocodile stitch" row and not a foundation row.
-Gauge is not important so to get a larger bag without altering the pattern, use a larger hook and bulkier yarn. And to get a smaller bag, use a smaller hook and thinner yarn.
-A great video tutorial for the Crocodile Stitch

Abreviations:
ch-chain
sc-single crochet
dc-double crochet
V stitch- 2 dc in same st
Crocodile stitch- using a front post technique, work 5 dc on the first post from top to bottom, ch 1, 5 dc on the second post from bottom to top

 I used worsted weight yarn (Caron Simply soft in Grey Heather and Soft Pink) and an H hook.
 

Color A
ch 76

ROW 1 foundation line: dc in 4th ch from hook. [v stitch ]*ch 2, skip 2 ch and 2dc in next ch* repeat * to end  {25 v stitches}

ROW 2 crocodile stitch row: ch3

turn and work a crocodile stitch on the first set of dc (using a front post technique, work 4 dc on the first post from top to bottom, ch 1, 5 dc on the second post from bottom to top)
*
ch 1, skip next V stitch and work croc stitch in next V stitch *
Repeat from *  * the length of your work, working 13 crocodile stitches total and ending with a crocodile stitch.

sl st in center of last croc stitch. ( croc stitches will be "loose", not attached to the foundation row, you will attach them in the next foundation row)  {13 scales and 12 V stitches not worked}

ROW 3 foundation line: ch 1, sl st in center of scale, ch 3, dc in center of last croc stitch [ the same one you sl st in], * ch 2, v stitch in next v stitch (one that is in between the scales) --- making sure to include the ch1 from croc stitch from last row. this will attach the scale to your work.--- work the rest of the row from * to end of the row (making sure you end with v stitch in the center of the last scale)   { 25 v stitches}

ROW 4 crocodile stitch row: ch 1, sl st in first v stitch, ch 2, croc stitch in next v stitch, ch 1. *skip next v stitch, croc stitch in next v stitch, ch 1* repeat * to the end. At the end, you will have one v stitch left over, sl st in v stitch.  {12 scales and 13 v stitches not worked}

ROW 5 foundation line: ch 3, dc in center of first v stitch (same st as ch3). ch 2, v stitch in center of scale. *ch 2, v stitch in next v stitch (one that is in between the scales) --- making sure to include the ch1 from croc stitch from last row. this will attach the scale to your work.--- ch 2, v stitch in center of scale.* work the rest of the row from * to end of row (making sure you end with v stitch in the end of the last scale)   { 25 v stitches}

ROW 6 crocodile stitch row: Work the same as ROW 2 {13 scales, 12 v stitches not worked}

ROW 7 foundation row: Work the same as ROW 3 { 25 v stitches}

ROW 8 crocodile stitch row: Work the same as ROW 4 {12 scales and 13 v stitches not worked}

ROW 9 foundation row: Work the same as ROW 5  { 25 v stitches}

ROW 10 crocodile stitch row: Work the same as ROW 2 {13 scales, 12 v stitches not worked}

ROW 11 foundation row: Work the same as ROW 3 { 25 v stitches}

ROW 12 crocodile stitch row: Work the same as ROW 4 {12 scales and 13 v stitches not worked}

ROW 13 foundation row: Work the same as ROW 5  { 25 v stitches}

ROW 14 crocodile stitch row: Work the same as ROW 2 {13 scales, 12 v stitches not worked}

ROW 15 foundation row: Work the same as ROW 3 { 25 v stitches}

ROW 16 crocodile stitch row: Work the same as ROW 4 {12 scales and 13 v stitches not worked}

ROW 17 foundation row: Work the same as ROW 5  { 25 v stitches}

ROW 18 crocodile stitch row: Work the same as ROW 2 {13 scales, 12 v stitches not worked}

At this point, you will have 9 rows of scales, measuring aprox 5 1/4" high and 18" long.  You may continue to add rows (starting with row 3 again and working to row 5) until the bag is as high as you would like it. I have decided to keep it smaller and am ending the scales with ROW 18.
 
FINISHING: fold in half and Sl stitch down the side, joining the rows evenly as you go. sc in each st across the bottom to join. Fasten off, weave ends in.

 
HANDLES:

Change to color B (if desired)

starting at the top of the bag opening:

sl st in the side that you stitched together.

ROW 1: sc in each stitch around, I sc in the center of each scale and 2 sc in each side of the scales and one in between. { I ended up with 70 sc } Join with sl st

ROW 2: ch1, hdc in each sc , join with sl st. { 70 hdc}

ROW 3: ch1, hdc in each hdc , join with sl st. { 70 hdc}

ROW 4: ch2, dc in each dc , join with sl st. { 70 dc}

ROW 5: ch1, sc in next 12 dc, ch 12, skip next 12 dc, sc in next 24 dc, chain 12, skip next 12 dc, sc in next 12 dc. Join with sl st.  (If you would like to increase the size of the handle, increase the ch stitches. ie: from 12 to 14 or 16 will make a larger handle )

ROW 6: ch1, sc in first 12 sc, 12 sc in the ch for the handle, sc in next 24 sc, 12 sc in the ch for the handle, sc in last 12 sc. join with sl at and fasten off. weave in ends.

(if you'd like to make your handle thicker, make another row or two. I decided I liked it thinner this time)

Cut coordinating fabric to measure 19" X 6 1/4".
Fold in half and, with a 1/2" seam, sew up one side and the bottom.
Press the seams flat and fold over the top (raw edge) a 1/2" and press.
Pin in place and stitch into place.


You can also add a closer to the bag, where the fabric is attatched so It'll stay shut, or a zipper. The options are unlimited! Have fun!


[Pattern inspired by Sara McFall of My Merry Messy Life ]


Saturday, November 3, 2012

Back in the saddle again

My computer issues are FINALLY fixed! I am so excited to be blogging more each week. I'm not sure how my week will be structured and I still have a lot to learn on how to insert links and such. But I am grateful that the computer is now cooperating with the Internet and we are all very happy about it!  Since it has been a while since I've been on my blog, posts and such have changed and so I'll be learning how to blog all over again. LOL!!  (I have decided already that I like the new version of blogger! I just hope I can continue to love it more each time! )

I am currently working on a new project. I was inspired by a link I found on Pinterest [who ISN'T inspired, overwhelmed and overjoyed with Pinterest???!!] The  Crochet Crocodile Clutch is very cute, a stitch I already know and LOVE but I wanted to make it my own. That is what I'm working on right now. I'll be posting my pattern for free and a tutorial this weekend. For now, I'm off to finish up the purse and take pics. Happy Hooking!

Tuesday, November 22, 2011

I got it!

I've been wanting to have my own website {other than the etsy.com} and now.. I got it! It's official. I'm now the proud owner of www.heysharky.com ! I can't promise that it is up and running anytime soon.. but I have it and it's a work in progress. I'm hoping to launch it in January. :)

Sunday, September 4, 2011

What to do with a door?? Update..

Sooooo that door I picked up many moons ago [intending for it to be our headboard] has now now been sawed in [almost] half, sanded, prepped and ready to go.

To start off the project I employed.. OK mainly bugged my best friend to help with the first layer.... I know she must by now KNOW that I am out of my mind when it comes to art projects, I don't think she was quite aware of what she was getting herself into. And bless her heart, she's still my best friend...

I ripped up a book, a novel based on a nautical story- how very appropriate {or at least I seem to think so}- Ripped it up, glued it down, and started drawing on it. Below is the {short} progression thus far. And the first picture is the old 1400's map that I am basing my artwork after.

The design has been altered too many times to count by now, but I am very pleased on the progress. The work done below was done in a matter of 3 days.. While [at the moment] it sits in my living room because we are fighting, I'm am positive that we will make up and the project will resume and be done on schedule.


Progress, outer part of paneling covered. Originally I ordered these awesome 1530s map [replicas] to cut up and add to the door. [did I forget to mention our bedroom is nautical themed? My interpretation of a captains quarters.. ] I was in love with these maps and have every intention of using them.... (now they sit in my closet for use somewhere else in the room). Until...... I was mid gluing [and had gotten my fingers stuck to the door once again.] upset that I hadn't figured out what direction I truly wanted it to go in I was struck with a thought of sheer brilliance. Instead of the maps being modge podged to the door, I'd draw my own. After all, what was the grueling hours of art classes for, right?


The full door... almost covered..


Finished gluing all the ripped pieces down... Then painted with water color to give an aged look.


And the map [as it is today]


So far, I am very pleased with how it is turning out. As i mentioned above, the door and I.. well, are fighting. I know this might sound a bit odd, but we are. I started sketching the latitude and longitude lines and uh! It just wasn't coming out right. I'm peeved that I can't get it right and don't want to do a "loose interpretation" of the latitude and longitude. I know no one else but myself will even really notice [or subsequently care] but I would. And that bothers me. The door now sits to the right of my desk, with its back turned until I can calm down and obsess about the right way to approach said lines. Until then I have been working on other projects for clients and once I'm finished with those this weekend I might turn my attention once again to the door. Perhaps I might continue on the area with the compass rose and finish up the zodiac wheel. Perhaps.


internet explorer sucks

I have just learned that the reason I have not been able to post in forever is due to the fact that Internet Explorer just plain sucks. Apparently after I updated it, blogger stopped working for me. This has left me utterly frustrated and down-right ticked off. I have had so many projects completed and now an ridiculously backed up on my posts.... which, might I add, most likely wont end up being posted for a while.. thank you Internet Explorer. So.. now that I know what the problem is, I will be posting WAY more frequently and you may again start to follow my blog :)
Thank you FireFox for being awesome!

Wednesday, August 10, 2011

I must be lame....

I can't seem to get a post up onto this blog, I don't know what I'm doing wrong. I click the "publish Post" button, but alas.. nothing. nada. nine. uh! What am I doing wrong. I'm hoping to be able to fix this problem, esp since I have over A DOZEN posts to put up! ***fingers crossed** today might just be the day I get it right!

Sunday, July 17, 2011

post-poning

I keep meaning to post all the wonderful things I have been working on, but alas either the computer freezes, the camera wont upload photos to the computer, or I'm just so darn tired by the time the boys are asleep that I just can't think straight. Have days like that? For me, it seems to be more and more frequent as of late. Many apologies and I'll make sure to start the whirlwind of uploads, posts and projects in the coming weeks.
Thanks for dropping in..
ps.. as I'm trying to get blogger to post this, it's just not working *sigh* [still] one of those days.

Thursday, May 5, 2011

Kitchen re-do

It's been driving me nuts that the kitchen isn't how I want it to be. Besides the fact that we rent this duplex and I can't knock out a wall or two to make more room.... and our 'kitchen' is a laundry room, kitchen AND dinning room all in one! Gesh!


Yes, you heard me right. There are the washer/dryer hook ups right next to my convection oven and the back door. And some where beside the deep freezer, microwave, wine cellar [used for sparkling cider] , and the fridge is where our table and 4 chairs is supposed to go. Space is limited and I am getting to be a master at organizing and decorating small spaces!


So part of my solution to this massive problem is to make the back patio our 'dinning room' and paint a few things in the kitchen to make it mine.


Here's what I've done....


Problem:

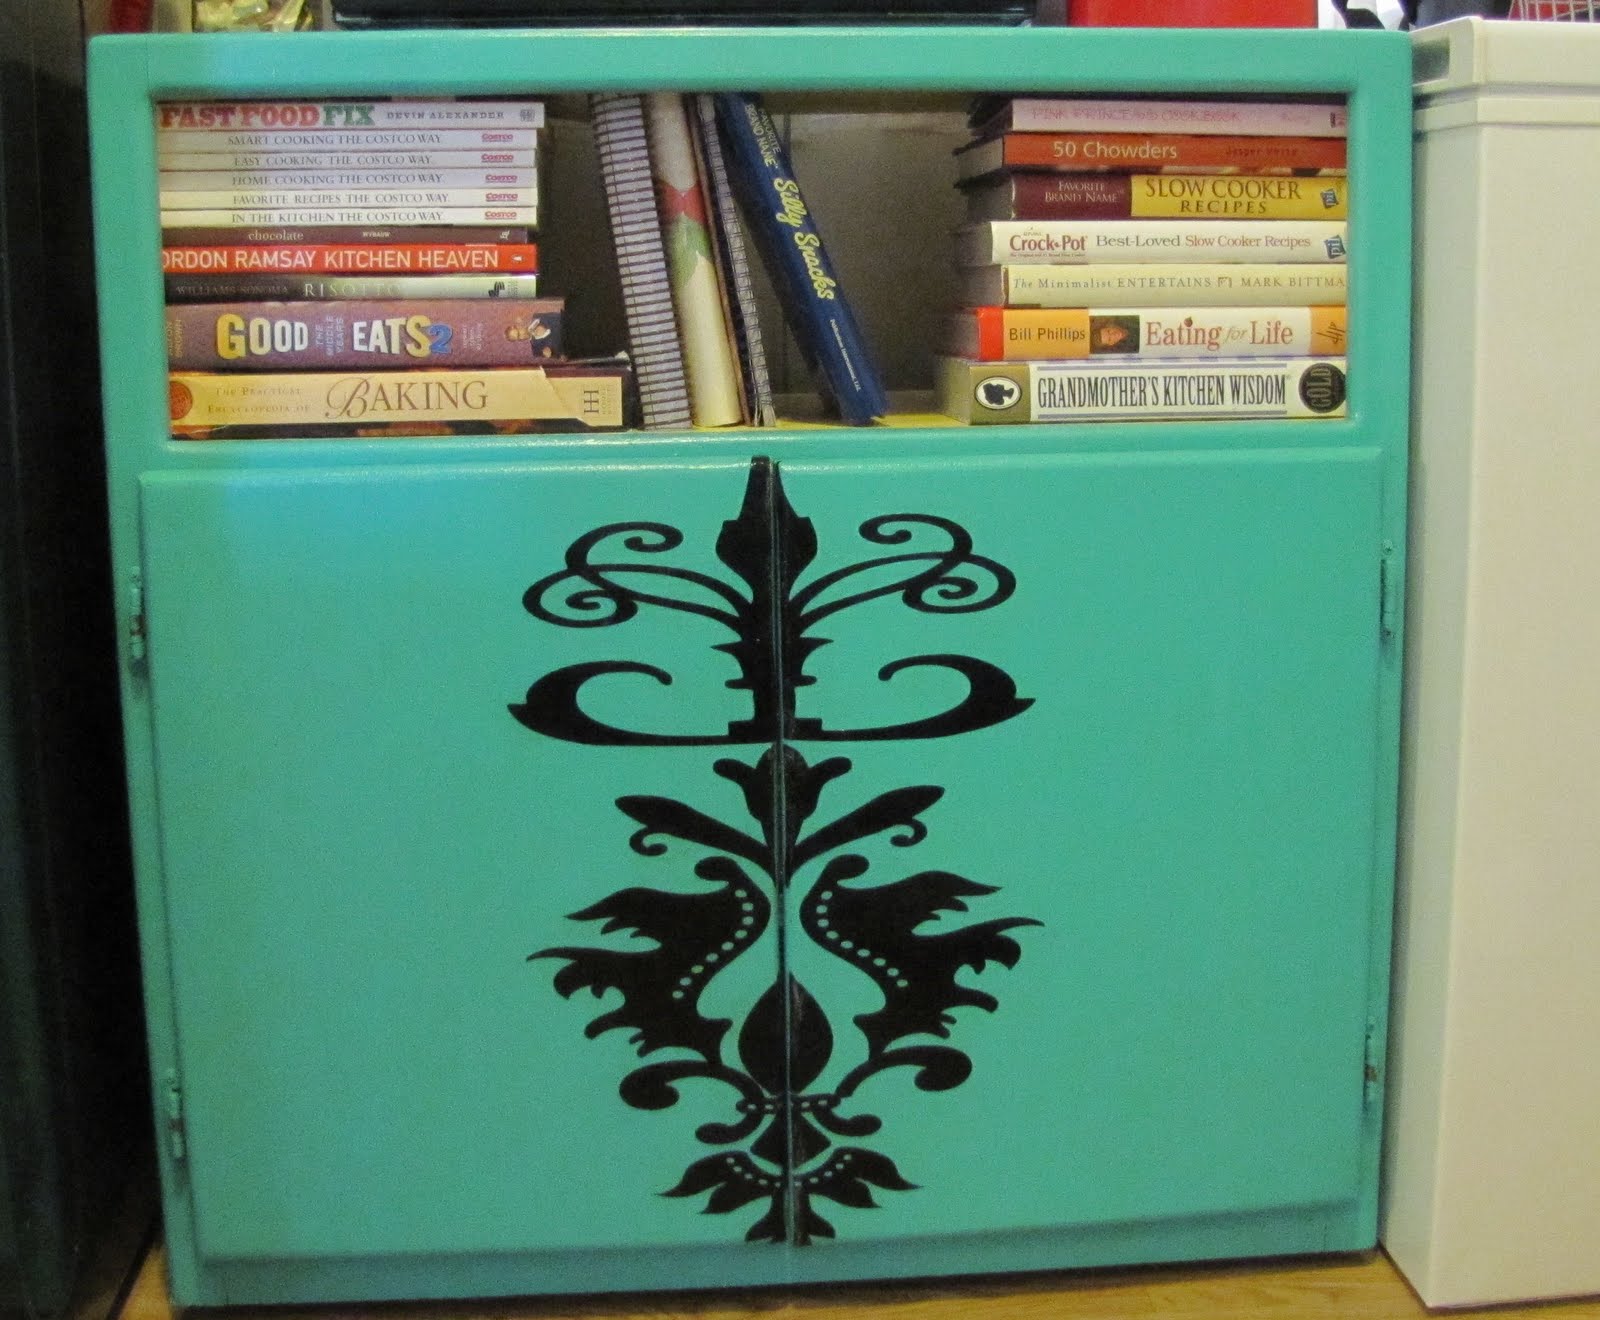
I've had this small entertainment center [if you could even call it that....] for years now and haven't done much with it because I was too afraid of messing up! Well not anymore!!!


Solution:

I went and got some paint I loved [Behr- in Cozumel and cornmeal] and got to work. My 3 yr old even helped me paint with his mini roller. I painted the majority of the cabinet Cozumel and used the Cornmeal on the shelf [where the cook books reside] and the inside. It really brightened up the inside, making it so cheery! I cut out a flourish [or two] on my silhouette and applied it on the front. I used modge podge to seal the design on and clear coat for the rest of the piece. I am IN LOVE!!! As I started it, however, was a different story. I kept feeling regret with my paint choices and thinking it was looking so juvenile. In the end I trusted my artistic intuition and I'm glad I did :) It has a space on the top for the microwave and cookie jar, a shelf for my cook books, and a space underneath for storage :)


Problem:

This next thing is a gift I received from a dear friend many years ago. While I love the message, ["Laugh often, Live much, and Love with all your heart"] the decor just didn't match how I decorate. It was VERY country. At one point I probably was more inclined to decorate with country but not anymore.


Solution:

I prefer french provincial infused with Mediterranean. So this needed to be redone [and I might re-do it again because I'm not sure it's what I want but it's better.] I did keep the original and put it behind the new one before re-sealing the back. I painted the frame in Cozumel [same as the cabinet]. Then I found a font [ck becky] that I adore - once I fiddled with it for a bit I printed it out and put it in the frame. Easiest part of the decor re-do!


Sunday, May 1, 2011

Newest stuff

My newest projects! The first is a crocheted lion , Lenard. I put a rattle in him so he makes such a cute baby toy :) I love him so much I think I might just have to make more of him!


The next is a rectangular pillow made from Crepe Satin and cotton. I hand painted the sparrow and the name then hand beaded them. This particular pillow is a Christmas present for a cousin but I have this one on my etsy shop as a customized item. I am very excited about this one because I LOVE pillows and beadwork!


I made some invitation too. Tea parties are a big deal right now- I've always loved them, the elegant dresses and hats. The amazing food. A warm beverage. Great company. You just can't beat it! I had a tea party fo rmy birthday this year and it was seriously the best!

These are also on my etsy shop.


Monday, April 25, 2011

Projects in the works

I've been so busy with my etsy and whoopdwhoop shops oh! and camping.. ad Easter outfits and ...and.. and.. Does it EVER END???!?!?!?!? NOpe. And I don't think I want it to. I have ideas in my head about EVERYTHING >>>> it drives me bonkers at times because I want to do so many things but don't ever have the time [or money] to do it. With 2 boys under 3 that takes a good majority of my time. But I LOVE THEM! So here are the things I have promised to finish this week.. [and not in any particular order]

*clean and organize the kitchen [time to bust out the cleaners, boxes and silhouette !]
*finish organizing the boys' room
*finish our headboard
*update my blog[s] - yes I have more than one, don't we all? LOL!]
*make 3 hats [fill orders]
*reupholster the dining room chairs

What projects have YOU started or thought about starting??? Go get it done!!!

Wednesday, April 6, 2011

what to do with a door?!

I've been wanting to make a headboard for our bed. Ever since we got rid of our cal-king water bed we've been sleeping on just box spring and mattress.. well those are set on a simple frame too. So no more head-board for us :( [I say 'just' as if our bed isn't nice.. it is, just no headboard] I've been DYING to purchase a door, but they are just so dog-gone expensive! I was driving to pick my hubby up from work a few weeks ago and saw a door chillin' on the side of the road, propped up on a tree labeled "free". As I drove past my inner craftiness yelled "MINE ! MINE! MINE! GRAB IT!!!!!!'' So I quickly stopped. Sitting in the car I thought, ''what are you thinking?!'' ''what will Cameron say???'' ''where are you putting this door?'' I almost didn't get out of the car to claim it as my own..... but what the heck?! It's free, I need one.. I have been looking for on for 3 years... DO IT! GRAB IT! And if it didn't work out, I can always toss it or label it free for someone else. So it is mine! Since then it has sat in my living room, taunting me..... pleading with me to just get it made already! [or at least started!] But what to do???? Still not sure. sorry to disappoint my readers... I haven't figured it out yet, so I guess this post is a bit of a tease... but I assure you, I'll be working on it this week to come up with a plan. AND if I'm able to remember to take pics along the way, I'll make a tutorial for you. tutorials are hard for me cuz when I get into my creative groove it's hard for me to stop in the middle of it.. that really throws off my creativeness. but I'll see what i can get done :) My ''theme'' of the master bedroom is a nautical one. but I'm leaning more towards a captain's quarters. Any ideas?

Friday, April 1, 2011

Whoopdwhoop!

What?! Yeah, I said it... whoopdwhoop! It's a online community that is like etsy but currency free... I do have a few things listed there to swap. Don't have money to pay for stuff? You can get so many different homemade just by swapping! So cool. http://whoopdwhoop.com/profile/view/u.id/1146/n/HeySharky Check it out, start your own shop and swap!

Wednesday, March 30, 2011

Easy Wallet Tutorial

MY FIRST TUTORIAL! I've really been wanting to make one of my very own. I see so many well-written tutorials on the blogs I follow. I doubt this one will even hold a candle to those, but I hope you enjoy it and make a few of your own! Don't forget to show me what you've made!


{These are the pics I got when I asked him to show me his wallet. These were the best ones. He kept hiding it! Silly bill !}


This project is for my oldest son [who just turned 3]. He is all about collecting money but would like to hold it somewhere else other than his piggie bank. He loves daddy's wallet and I find him walking around with it in his pocket a lot. Hopefully with a wallet of his own he'll leave ours alone. Well, maybe. I asked him what he wanted on his wallet.... trains! cars! dump truck! animals! zoo! the wall! alligator! and the list goes on and on. What he {finally} chose was trains. I also let him choose the color of the fabric. He chose red. Which was totally weird since that was what I was thinking of using too! The only red fabric I have at the house is felt ... and satin. Felt is kid-friendly but oh so thick! So satin it is! This kid is going to have one heck-of-a-fancy wallet!


Materials needed:

*Fabric for lining [ enough for 2 rectangles - 4'' X 8.5'' each]

*Fabric for outer ''cover'' [ enough for 1 rectangle - 8.5'' X 10.5'' ]

*Paint

*Any other embellishments you'd like to use.

First I made a template for my 2 rectangles. Since I am going to make lots of wallets, I thought it would be nice to have a template on-hand.


Cut 1 {4'' X 8.5''} piece from your outer fabric. Mine is DENIM. I chose to use jeans because I love them! And I also have a TON of left overs......donated jeans from family and friends from when I was making a jean quilt. Jeans are also very durable, especially for a wallet for kids. I love how you can dress it up for a girl or grunge it for a boy.


ONE PANT LEG MAKES 10 WALLETS!! Since I was cutting one, I thought I'd cut up the whole leg. Now I have extras cut and ready for me to make more! [I think I might end up making those this week!]


Cut 1 large {8.5'' X 10.5''} rectangle. When working this pattern you will have about 1/2'' extra fabric to work with. I did this so you [ok mostly me] have a margin of error [sometimes the fabric slips etc. I like to always have a bit extra. If you don't like this, only measure 10''.]


Cut 2 lining pieces. 4'' X 8.5'' rectangle


Here are all the pieces. 2 lining, 1 outer and 1 large piece for the pockets.

{I apologize a head of time for the following pics.... I have no clue how to take a snapshot of my computer screen, except to just take a pic with my camera. Maybe I'll be cool enough someday to figure it out.}


I wanted to have a printed fabric but didn't want to go out and buy any. I've promised the hubby that I would only buy something for a project if I ABSOLUTELY NEEDED TO. And this wasn't a necessity. Good thing for me that I have a Silhouette Digital Die cutter! I JUST LOVE IT!!! I used to print things from the computer then cut them out and transfer or paint. Now I don't need to do that. So worth the investment!


I looked through my library and my son picked out the train he liked best.


Double click on image and it will be sent to a new document.


I separated the grouping and moved them around and adjusted the size to what I wanted. To see a full tutorial on how to use the Silhouette, visit their blog at: http://blog.silhouetteamerica.com/


Final draft before sending it to the cutter.

And ... CUT! I used freezer paper as my template paper because you can iron it onto your fabric and it stays while you play!


Waiting for it to finish cutting.


While the images are being cut out ... iron all fabric pieces.


Sew {with right sides together} the outer fabric [denim] and 1 piece of lining [red satin]. SEW ACROSS THE TOP ONLY!


Iron open.


Fold wrong sides together and iron.


Top stitch 1/8'' seam across TOP.


Sew 1/8'' all around to keep the lining from shifting. This helps it to stay put. I hate seem-ripping so this really helps with my sanity!


Here are all the trains all cut out. Silhouette= time saver!


Cut the images into strips and iron SHINNY SIDE DOWN onto fabric, using med-high heat NO STEAM!


Putting on the windows ... a little time-consuming but well worth it for me. If you don't have the time or patience for this, try using the cut out. It will give you a negative space, but is a time saver :) I used my QuicKutz Quick Stick ... the sticky end to help grab and hold those teeny tiny windows.


All finished! Well, with the ironing on, at least!


Paint. I used stippling in each image to give an uneven feel to it, add some texture.

Set aside to dry. Took about an hour to dry completely. I set it outside in the sun.


Once the paint is dry, peel off the freezer paper. I used the acrylic end of my QuicKutz Quick Stick. There is a pointed edge and a flat edge. I used the flat to slide under the paper and the pointed end to finish cleaning up the fabric.


This is what it looks like all painted and paper cleaned off. I love making my own printed fabric!


{oh, and yes, I realize that not all the windows are out of the train ... I saw that well after I had taken this pic and numerous other ones! LOL}


Mark. Fold and iron in the following increments:

{measuring from top and working down to the bottom}

3''

1.5''

2''

1.5''

2''

I marked a little over each measurement to compensate for the folds. ie- instead of right on the 3'' I marked 3 1/16''.


Measure where the center of the wallet will be. Mark with tailors chalk or wash-able pen.


Sew down the middle. If you would like to have a snugger fit for the cards, sew a 1/8'' line on either side of the middle line. {see picture below} THE CARDS WILL BE VERY VERY SNUG IF YOU DO 3 LINES. I like it both ways.


Top stitch 1/8'' across the top. Sew 1/8'' around all sides, this is just to hold the fabric in place. I hate to seem-rip and satin slides all over the place. This helps me keep my project going quickly and smoothly.


With outside cover [denim] facing inside pockets sew a 1/2'' seam down one side, across the bottom and up the other side.


It should look like so!


Trim corners.


Clip threads. Trim excess fabric from sides and bottom. I trimmed about 1/8'' and 1/4'' from the seam line.


Turn right-side out.


Iron as flat as you can :) With denim it is difficult to get it completely flat, but this step is worth it.


Top stitch 1/8" around both sides and bottom. [don't stitch your top closed!]


This was a little bit of an after-thought ... my logo/tag. So instead of sewing on my tag like I normally do [ok ... so like I SHOULD HAVE done ... I used an iron-on transfer to act as my tag :) It's less likely to get pulled off by my son so I think it is a good way to go]


Iron on the freezer paper to the outside of the wallet, making sure to get all edges so paint doesn't seep.


Apply paint liberally. I used a swirling and stippling motion to get a grungy effect. Set aside to dry for about 30 mins to a few hours, depending on how much paint you applied. If you would like it darker ... do another coat or two.


When dry, peel off freezer paper.


Finished!


Don't forget to send me YOUR finished wallets! And please ... I need feedback on how this was written! What did you like best? What can I improve on?